
If you are looking to bring warmth, rich texture, and a cozy handmade feel into your space, you are in the right place. Today, I am thrilled to share the Mars Cushion Cover, a modern crochet pillow design inspired by the comfort of slow living and the beauty of adding personal touches to everyday decor.
This project is incredibly beginner-friendly, uses simple stitches to create that gorgeous textured look, and whips up faster than you think! It’s the perfect accent piece for your living room couch or bedroom setup.
Mars is a modern crochet cushion cover created to bring warmth, texture, and a sense of
home into your space. Inspired by the joy of surrounding yourself with handmade pieces, this
design reflects the comfort of slow living and the beauty of adding personal touches to
everyday decor.

The mix of simple stitches and the popcorn (bubble) stitch adds a soft, inviting texture that
feels cozy yet refined, making this cushion a perfect accent for modern, minimalist, or warm
interiors. Made with two panels, the pattern gives you complete creative freedom—whether
you choose matching sides, subtle variations, or contrasting colors that tell your own story.
Beginner-friendly and thoughtfully designed, Mars is an enjoyable project that works up
beautifully and quickly. More than just a cushion cover, it’s a handmade piece meant to
make your home feel more personal, more intentional, and unmistakably yours.
Materials Needed:
- Acrylic yarn (I used acrylic yarn and it has worked very well for this project) Below are someyarns I recommend Estako & Himalaya Everyday Bebe Lu
- Crochet hook (size recommended for your chosen yarn)
- Scissors
- Polyester filled in pillow
**Yarn links are provided for reference only. This pattern is not sponsored, and you may use any similar yarn you prefer.
Abbreviations US Terms:
-mg: Magic Ring
-ch : Chain
-sl st: Slip Stitch
-sts: Stitches
-sc : Single Crochet
-dc : Double Crochet
-pc: Popcorn stitch
Pattern Notes:
- Turning chain-2 does not count as a stitch.
- My pillow insert measures 45 cm x 45 cm, but you can use any size you prefer, whether slightly
smaller or larger. For this reason, I won’t provide a specific number of starting chains for the
pattern. However, I will share the number of chains I used as a reference. Please keep in mind that this number may vary depending on the type of yarn and hook you choose. For my sample, I used a 4.0 mm hook and acrylic yarn. - Keep in mind that this piece is made with two panels, so it’s fully customizable. You can make
both sides the same, give each side a different look, or even use different colors on each
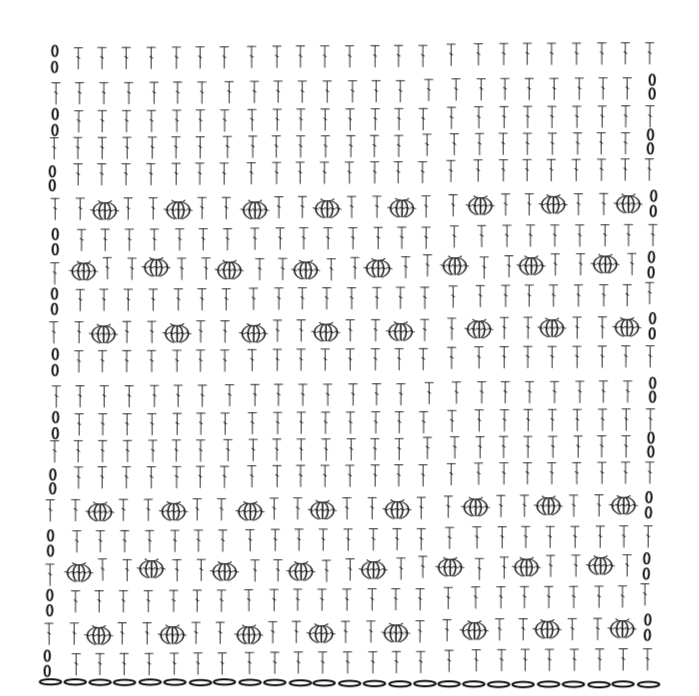
panel—just like I did. - Refer to the pattern diagram below for visual guidance and to clarify any questions regarding
the stitch sequence and construction. - Use the reference video provided at this link
Instructions:
Foundation Chain: For my 45 cm x 45 cm pillow insert, I used 85 starting chains as a reference, however, since you can use any pillow size, I recommend measuring your foundation chain as you go to make sure you achieve the correct length.
ROW 1
Dc in the 3rd chain from the hook (this counts as your first dc), then continue working dc across the foundation chain.
Repeat Rounds 1–11 until you reach the desired length.
ROW 2
Chain 2
Popcorn stitch.
Dc in the next two stitches.
Repeat across the row.
ROW 3
Chain 2, then continue working dc.
ROW 4
Chain 2
Popcorn stitch.
Dc in the next two stitches.
Repeat across the row.
ROW 5
Chain 2, then continue working dc.
ROW 6
Chain 2
Popcorn stitch.
Dc in the next two stitches.
Repeat across the row.
ROW 7-8-9-10-11
Continue working double crochet stitches across each row for the next 5 rows.
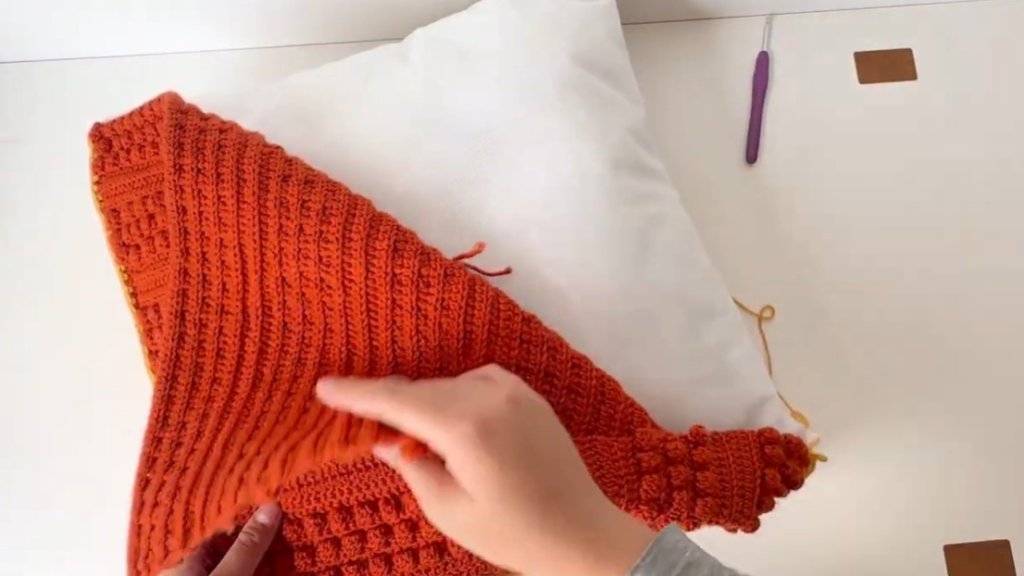
At this point, you should have one panel completely finished. From here, you have several options: you can make the second panel exactly the same as the first one, change the color, work it using only the popcorn stitch, or make it using only double crochet stitches.
I made one side in orange and the other in mustard, working only dc in the back loop only (BLO)
Once both sides of your cushion are finished, make sure they are the same size before joining them together. We’ll start joining them without the pillow insert inside to make it easier to work, and then finish the join with the pillow insert in place.
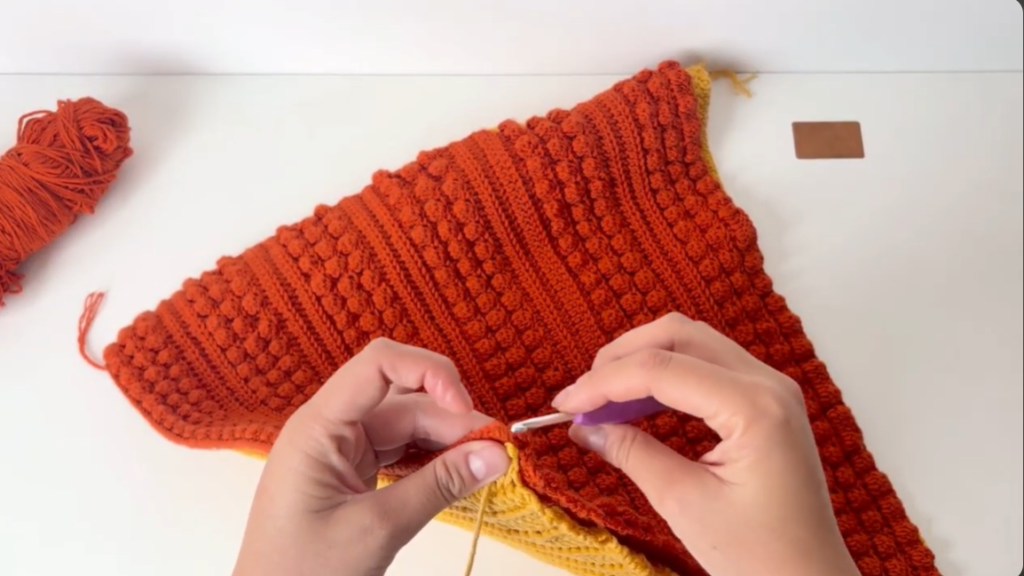
Single crochet into the loops you find on each edge of the cushion. Try to only pick up the first loop you see on each side so you don’t distort the shape of the cushion.
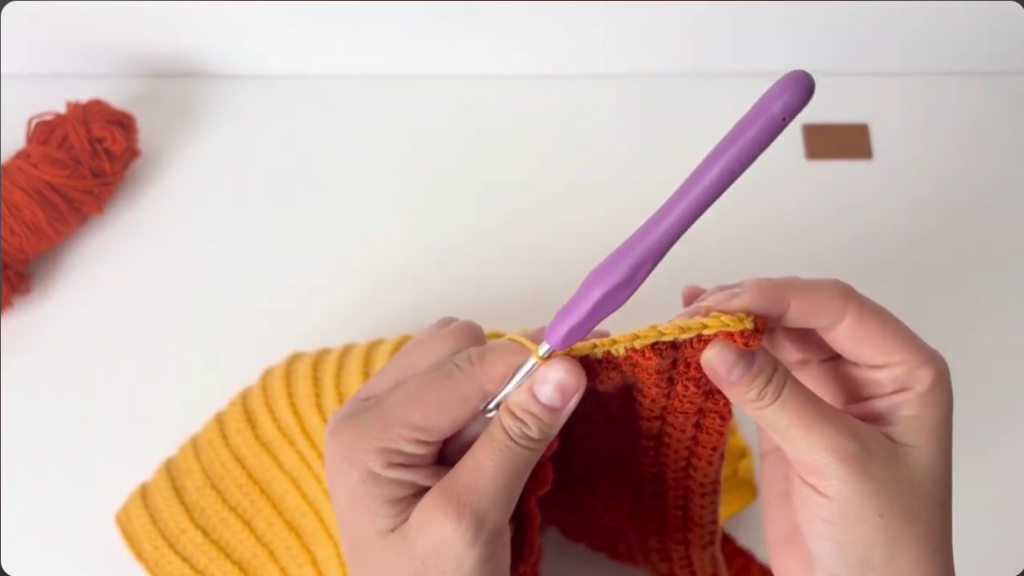
To join the two panels, we’ll single crochet around the first two sides of the square, and once those sides are joined, place the pillow insert.
Finish your project with a slip knot and weave in all ends.

3 thoughts on “Easy Crochet Pillow Cover Pattern – Free Step-by-Step Tutorial.”