Have you fully immersed yourself in the world of crochet and reached a point where you need to learn how to read patterns to try new projects, but you have absolutely no idea what all those little symbols, charts, and terms mean?
Are they leaving you feeling completely lost?
I was in your shoes, and I had to learn the hard way. However, this post is going to save you from that struggle.
I’m giving you all the ultimate hacks to start reading crochet patterns like an absolute pro, without any stress at all!
What to Expect When Reading a Written Crochet Pattern
Table of Contents
When you buy a pattern or find one online, you will usually see a Table of Contents. This is the logical roadmap you need to follow to finish your project like an absolute pro.
At the very beginning, you’ll typically find a brief introduction to the pattern, along with a note from the designer thanking you for your purchase or support.
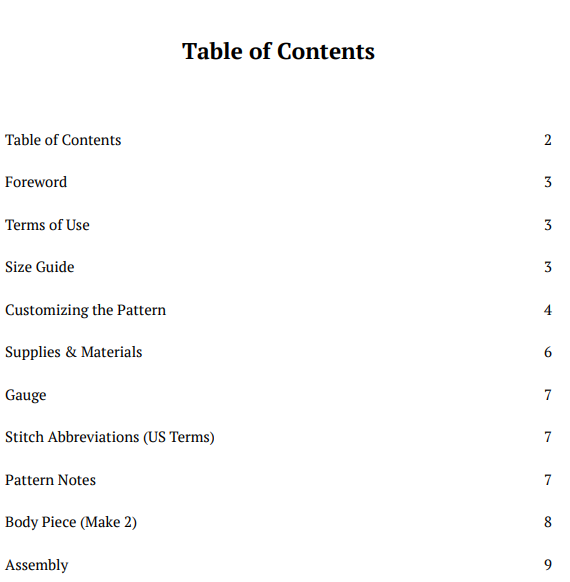
As you dive deeper, the Table of Contents will guide you to crucial information, such as the size chart—depending on whether you are making a garment or an item like an amigurumi.
At this stage, it is highly recommended to read through the entire pattern before beginning your work, especially if your pattern includes a section called “Customizing Your Pattern.”
Size
The measurement and size chart in your pattern is about to become your new best friend.
Make sure to follow these sizing instructions strictly to ensure that the finished garment fits your body perfectly!
Supplies & Materials
Every yarn has a different finish, thickness, and durability. At this point, I highly recommend sticking to the designer’s suggestions so your finished piece turns out as close as possible to what you’re looking for.
Additionally, the pattern will tell you approximately how much yarn yardage or weight you will need to successfully complete your project.
Gauge
Gauge is measured by creating a small swatch using the stitch mentioned in the pattern. Making this swatch is incredibly important because it will determine exactly which hook size you need to use.
You might feel too lazy to do it, but please don’t skip it! Tension is absolutely crucial when it comes to crochet patterns—especially for garments.
It will usually look something like this:
Gauge Swatch: 11 rows of 19 DC = 4” x 4” using a 3mm hook. If your swatch is larger than 4” x 4”, use a smaller hook; if it’s smaller than 4” x 4”, use a larger hook.’
Stitch Abbreviations
Regarding this topic, you are going to encounter a lot of abbreviations that can be written in either US terms or UK terms. Usually, patterns are written using only one of these two terminology systems, so make sure to check this carefully before purchasing or starting your pattern.
Below, I will share the main abbreviations you will find in most patterns, covering both US and UK terminology:
| US Term | UK Term |
| ch (Chain) | ch (Chain) |
| sl st (Slip Stitch) | sl st (Slip Stitch) |
| sc (Single Crochet) | dc (Double Crochet) |
| hdc (Half Double Crochet) | htr (Half Treble Crochet) |
| dc (Double Crochet) | tr (Treble Crochet) |
Pattern Notes
I know I’ve already said a lot of things are ‘incredibly important,’ but seriously—paying attention to the designer’s notes is going to save you so many headaches down the road.
This is where they clarify crucial details, such as the specific stitches you’ll be using, technical tips, measurements, sizing info, hook recommendations, tension adjustments, and so much more.
Rows vs. Rounds
Rows: If your pattern says “Row 1”, it means you are working flat (turning your work at the end of each row), like when making a classic scarf or a blanket.
Rounds: If it says “Rnd 1” or “Round 1”, you are working in a circle without turning your work, which is the standard method for amigurumis, hats, and granny squares.
A typical line in a crochet pattern will look something like this:
Row 2: Ch 1, 2 sc, dc next 5 sts, inc in next st, turn. (9 sts)
Let’s break down exactly what that means in plain English:
- Ch 1: Chain 1 (your turning chain).
- 2 sc: Make one single crochet in each of the next 2 stitches.
- dc next 5 sts: Make one double crochet in each of the next 5 stitches.
- inc in next st: Make an increase (two stitches into the exact same space) in the very next stitch.
- turn: Flip your work around to start the next row.
- (9 sts): The number inside the parentheses at the end of the line always tells you the total stitch count you should have when you finish that specific row. Always count your stitches!
How to Read Crochet Charts and Diagrams
A crochet chart is simply a bird’s-eye view drawing of your project. Each stitch is represented by a specific symbol that looks exactly like the physical stitch you make with your hook.
Here is how you crack the code of visual diagrams:
Crochet diagrams
While designers might tweak things slightly, the basic symbols are standardized worldwide:
- An open oval or circle: Represents a Chain (ch).

- A small dot or filled oval: Represents a Slip Stitch (sl st).

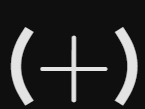
- A small plus sign or a “X”: Represents a Single Crochet (sc).
- A Capital “T”: Represents a Half Double Crochet (hdc).
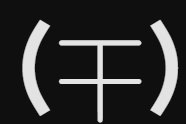
- A Capital “T” with one slash through the stem: Represents a Double Crochet (dc).
Where do I start reading?
This is where 90% of beginners get stuck. You don’t read a chart the way you read a book!
- For Flat Projects (Rows): You start at the bottom right corner (Row 1) and read from right to left. For Row 2, you move up and read from left to right (following the direction you turn your fabric). Charts usually have little numbers at the edges indicating where each row starts.
- For Circular Projects (Rounds/Amigurumi): You start right in the absolute center (usually a small circle representing the magic ring) and read counter-clockwise, moving outwards like a spiral.
Follow the Arrows
Most good modern diagrams will include small arrows pointing you in the exact direction your hook should travel. If you see a cluster of symbols coming out of the exact same spot at the bottom, that’s your visual cue for an increase or a shell stitch!
Diagram example
Here is an example of a crochet chart I designed for my own Cushion Cover with Popcorn Stitch. While the specific symbol for the popcorn stitch isn’t the most common one you’ll see out there, using a visual diagram still brings so much clarity to the project!
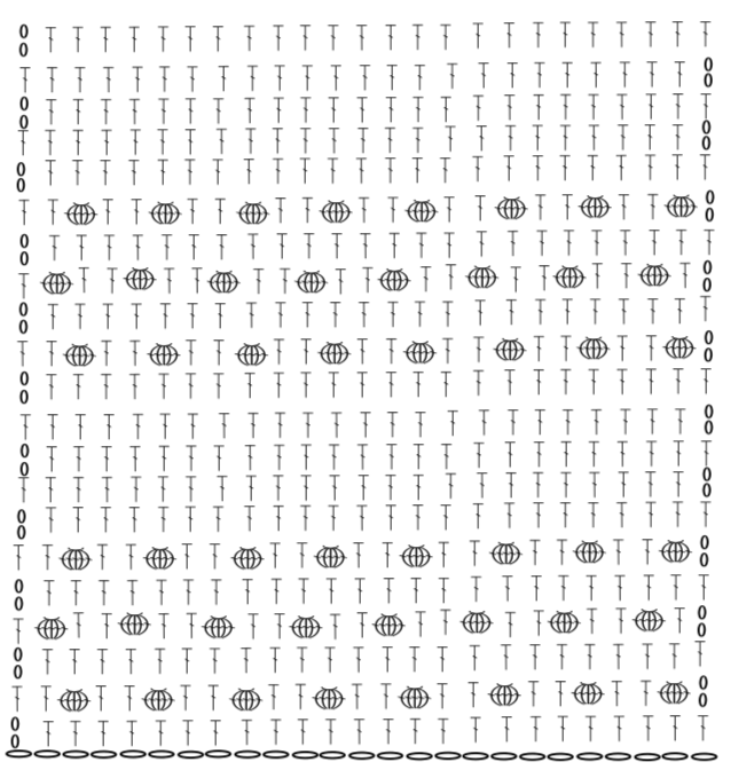
Instead of reading a long, confusing sentence of written instructions for every single bobble, you can just look at the chart, see exactly where the texture pops, and follow the flow with your hook.
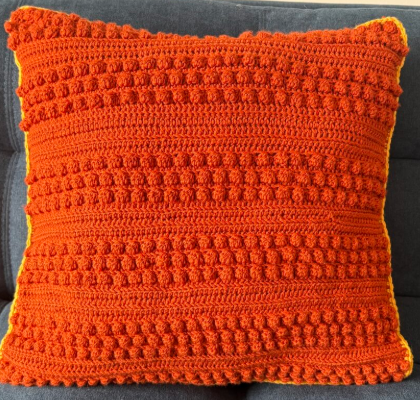
If you want to read the full free pattern you can find it here!
If you’ve made it this far into the world of crochet, I just want to say that your dedication is amazing! At this stage, we are basically talking about a completely different language, and the fact that you want to master it says so much about your passion for this craft.
The very first time I saw a chart like this, it was on Pinterest—and I understood absolutely nothing! However, once I dedicated a bit of my time to decoding those diagrams, I realized two game-changing things:
- My crochet life became so much easier: Suddenly, I could understand complex stitch placements instantly, without even having to watch a video tutorial or flip through a massive written pattern.
- It truly is a universal language: No matter where a designer is from, those symbols look the same.
Once you unlock this skill, the entire world of crochet designs opens up to you!